Print version of this Book (PDF file)
Building a Parametric Model
In Chapter 1 we went through the typical steps needed to take raw extraction data and develop a parametric statistical model. This exercise was done as a tutorial on IC-CAP Statistics. If you haven't read this section, please refer to the procedure, which begins with Transform Data. In this chapter, we will provide expanded information on some of the steps related to building a statistical model.
The general steps needed to build a parametric statistical model are:
| 1 | Measure and extract model parameters |
| 2 | Start IC-CAP Statistics and import data |
| 3 | Transform distributions to Gaussian |
| 4 | Eliminate outlier data |
| 5 | Perform correlation analysis |
| 6 | Perform factor or principal component analysis |
| 7 | Generate model equations |
| 8 | Generate models |
| 9 | Test models |
Transforming Distributions/Eliminating Outliers
As stated in Chapter 1, one of the key assumptions made by multivariate techniques such as Factor Analysis is that the data set to be analyzed is a joint Gaussian distribution. If the data is not joint Gaussian, the model generated from the analysis may not accurately reproduce the measured density.
Therefore steps 3 and 4 in our procedure to build a statistical model can be done in any order. The elimination of outlier data can be done before or after data transformation. Outliers can be eliminated manually or through automatic data filtering.
Data Transformation
You have to decide which data columns need to be transformed. Generally, only some of the columns contain key parameters. Some columns may already be Gaussian. You can quickly plot the data to see if it is Gaussian.
To transform data, select a column and then choose Data > Data Transformations, a dialog box appears with the mathematical transforms available, as shown in the table below. To show the transformation, in some cases the parameter name is appended, also as shown in the table. For example, parameter TOX would become LN_TOX in a natural log transform.
None
Exponential
EXP
Natural Log
LN
Square Root
SQRT
Square
SQR
Constant Value
Mean
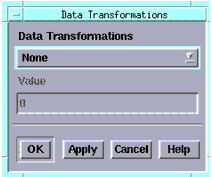
To select a transformation type, click the drop-down list button and select the type you want. If you select Constant Value, the Value field (center) becomes active, and you can enter the constant you want to substitute for your data.
Pairs of the transforms work as opposites. If you transform your data using Natural Log and want to undo the change, choose Exponential. Similarly, Square and Square Root work the same way. To undo either Constant Value or Mean, however, choose Undo Constant/Mean. More complex transformation types are available in the Main IC-CAP program. You can export data to be transformed and then import it back into Statistics.
Manually Eliminating Outliers
You can manually eliminate outliers by deactivating any row you believe contains outlier data. Select the row that contains the sample you want to deactivate and choose Edit > Deactivate or click the icon on the toolbar.
Automatic Data Filtering
You can automatically filter your data to eliminate outliers.
IC-CAP Statistics can filter data based on minimum/maximum values or by a scale value. Scale is defined as the median absolute deviation (MAD) divided by a constant (approximately 0.6745). This standardizes MAD in order to make the scale estimate consistent with the standard deviation of a normal distribution. The greater the scale value, the further from the median the filtering occurs. If too much data is eliminated using, for example, a scale value of 4, you can retrieve some of the data by repeating a single-pass filtering operation with a scale value of 3.
To use the Data Filter feature:
| 1 | Select a column you want to filter. |
| 2 | Choose Data > Data Filter. A dialog box is displayed. |
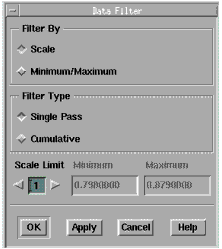
| 3 | To filter by a scale value, choose the Scale option button. Change the Scale Limit (near bottom) to the number you want by clicking the right arrow or typing in the field. |
| 4 | To filter by minimum/maximum values, choose the Minimum/Maximum option button and then enter your minimum and maximum values in the lower portion of the dialog box. |
| 5 | The Filter Type field (center) allows you to filter samples by a single pass or cumulatively. Choosing Cumulative means that rows eliminated during one filter pass remain deactivated during the subsequent filtering passes, regardless of the filtering criteria of the subsequent passes. Single Pass filtering deactivates rows based on only one filtering operation. |
| 6 | When done, choose OK. |
The data is filtered based on the parameters you chose. Note that eliminated rows are highlighted by a color change that indicates they have been deactivated.
To undo Data Filtering, choose Data > Undo Data Filtering.
Repeat Data Transformation and Outlier Elimination for Other Columns
Repeat the above steps for each column of data you want to make Gaussian through data transformation, manual outlier elimination, or data filtering.
Attribute Filter Options
Besides Data Filter and Undo Data Filtering, there are the companion choices of Attribute Filter and Undo Attribute Filtering. These choices work in the same manner as parameter data filtering but apply only to attribute columns.
To use the Attribute Filter feature:
| 1 | Select an attribute column you want to filter. |
| 2 | Choose Data > Attribute Filter. A dialog box is displayed. |
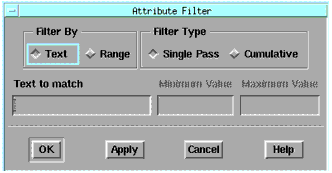
| 3 | If you want to filter by a character string that matches an attribute label (such as "sample1"), choose Text in the Filter By field, and enter the text in the Text to match field. |
| 4 | If you want to filter by a range of values (such as sample23 to sample29), choose Range in the Filter By field and enter the minimum and maximum values in the right-center part of the box. |
| 5 | The Filter Type field allows you to filter samples by a single pass or cumulatively. Choosing Cumulative means that rows eliminated during one filter pass remain deactivated during the subsequent filtering passes, regardless of the filtering criteria of the subsequent passes. Single Pass filtering deactivates rows based on only one filtering operation. |
| 6 | When done, choose OK. |
Performing Correlation Analysis
As stated in Chapter 1, correlation analysis provides a numerical measure of the amount of variation in one variable that is attributable to another variable. When an increase in the value of a variable is associated with an increase in the value of the other variable, the correlation is positive. When the increase is associated with a decrease the correlation is negative.
Correlation analysis is always performed before proceeding to factor analysis and the data used consists of all the rows in the spreadsheet that have not been filtered, deactivated, or deleted.
To perform correlation analysis, choose Analysis > Correlation Analysis. The Statistics window changes so that the Correlation Matrix folder is displayed. (If you want to go back to the parameter data before correlation analysis was performed, choose the folder tab labeled Parameters.)
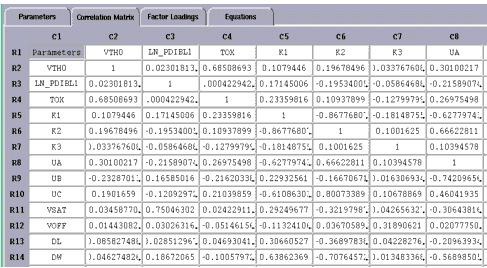
The Correlation Matrix displays the same parameters down the rows and across the columns. The correlation coefficients for any two parameters are displayed where the rows and columns intersect. In the preceding example, the cell R4 C2 has a value of about 0.69, which shows moderate to strong correlation between parameters TOX and VTH0.
Perform Factor Analysis
Now that the correlation matrix is defined, the next step is to perform factor analysis. To perform factor analysis, choose Analysis > Factor Analysis, a dialog box is displayed.
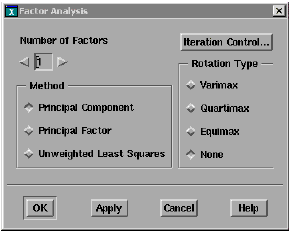
You choose the method of factor analysis from three choices:
| • | Principal Component —The principal component model of factor analysis. Direct calculation; no iterations. |
| • | Principal Factor—Principal factor analysis. Direct calculation; no iterations. |
| • | Unweighted Least Squares—A method of factor analysis using an iterative process. This methods is also knows as minres or the minimum residual method. |
Which of these three methods you should use depends on the model you are building. If your goal is to generate a set of equations with factors as the independent variables, then the principal component method, without factor rotation, is preferred. If factor analysis is being used as an interim step in building a regression model, then principal factor analysis or unweighted least squares should be used with one of the three rotation types.
A detailed description of each of these three methods can be found in Chapter 3, "Data Analysis."
You choose a starting figure for the Number of Factors you want to be found in your analysis. After you see the results, which correspond to the percent variation that can be explained by this number of factors, you can increase or decrease the number and repeat the analysis.
The Rotation Type field has four choices.
| • | Varimax |
| • | Quartimax |
| • | Equimax |
| • | None (default) |
For more information on factor rotation, refer to Factor Rotation.
The Iteration Control button (upper right) controls fine tuning for the Unweighted Least Squares and Rotation functions.
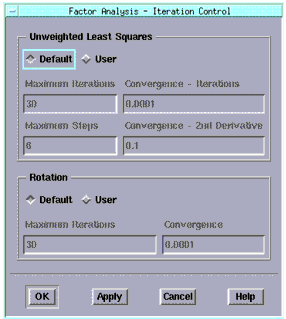
Therefore, if you select the Unweighted Least Squares method and click Iteration Control, a dialog box is displayed. You accept the default values (as shown) or choose User and type in the values for the following four parameters, as desired:
| • | Maximum Iteration. The maximum number of iterations that will be attempted before arriving at a solution. |
| • | Convergence - Iterations. When the relative change in the criterion function is less than this number from one iteration to the next, convergence is assumed. |
| • | Maximum Steps. The maximum number of step halvings allowed during any one iteration. |
| • | Convergence - 2nd Derivative. When the largest relative change in the unique standard deviation vector is less than this number, exact 2nd derivatives are used. |
Likewise, if you select a rotation type other than None in the Factor Analysis dialog box, and click Iteration Control, the same dialog box is displayed. For Rotation, you can accept the default values (as shown) or choose User and type in the values for the following two parameters, as desired:
| • | Maximum Iterations. The maximum number of iterations that will be attempted before arriving at a solution. |
| • | Convergence. When the relative change in the criterion function is less than this number from one iteration to the next, convergence is assumed. |
When done, choose OK to return to the Factor Analysis dialog box and OK again perform the factor analysis. The screen changes to display or update the Factor Loadings folder.
Figure 12 Factor Analysis Folder
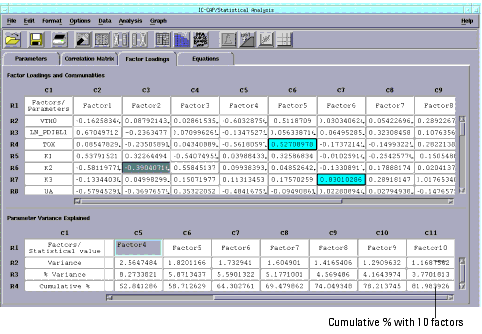
Factor Loadings Folder
Two tables are generated in the Factor Loadings folder. The first table contains the factor loadings, which represent the loadings (correlations) that relate each model parameter to each of the derived factors. This table also has a column called Communality, always displayed at the far right part of the table. This field shows the variance explained by all of the factors for a single parameter.
The top portion of the Factor Loading folder displays the data in a color-coded format. Factor Group data, one group per row, is displayed in a red font. Dominant Parameter data, one dominant parameter per column, is displayed with a blue background. These terms are defined as follows:
Factor Group. The factor group shows, for a given parameter, which factor the parameter is most highly correlated with.
Dominant Parameter. The dominant parameter is the one parameter in the column that has the highest loading (correlation).
The second table has three fields:
| • | Variance. Presents a summary of the variances associated with each factor. For example, a variance of 3.45 indicates that the factor accounts for as much variance in the data collection as would 3.45 variables, on average. |
| • | % Variance. Shows how much of the variance of all the parameters is explained by a single factor. |
| • | Cumulative %. Shows how much of the variance of all the parameters is explained cumulatively by from one to all of the factors. That is, as you move left to right in the table, the percentage increases as more and more factors are included. |
Note that the cumulative percent for the example shown in Figure 12, which was analyzed for 10 factors, is about 82%. See the lower right cell in the figure. This means that if only 10 factors were used to make a statistical model from this data, the model would explain 82% of the variance compared to using all of the parameters/factors.
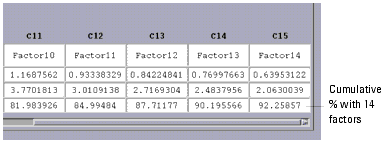
With 14 factors, the cumulative percent is about 92%, as shown in the lower right cell below. You have to decide how high a figure is acceptable for your work.
Factor Loadings Options on the Analysis Menu
The last four options on the Analysis menu are specifically for the Factor Loadings folder, and are only active when there is factor analysis data present. The options are as follows:
| • | Change Dominant Parameter. Select a cell that you want to become the dominant parameter for that column and then choose Analysis > Change Dominant Parameter. The program replaces the calculated dominant parameter with the one you chose. To revert back to the calculated dominant parameter, choose Analysis > Default Dominant/Grouping. |
| • | Change Factor Group. Select a cell that you want to become the factor group for that parameter and then choose Analysis > Change Factor Group. The program replaces the calculated factor group with the one you chose. To revert back to the calculated factor group, choose Analysis > Default Dominant/Grouping. |
| • | Default Dominant/Grouping. If you changed either the dominant parameter or the factor group, and you want to revert back to the one calculated by the program, choose Analysis > Default Dominant/Grouping. |
| • | Factor/Parameter Groups. Choose Analysis > Factor/Parameter Groups to display a summary table, which shows the dominant parameter for each factor and its value, as well as the factor group data. The dominant parameter data is shown first. For a given factor, all parameters that belong to that group are shown. |
Generate Equations
The next step is to generate equations from the factor analysis. IC-CAP Statistics supplies the equation coefficients that you use to build your SPICE model.
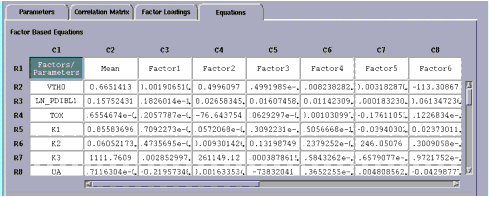
To generate equations, choose Analysis > Generate Equations. A submenu with the two choices by which the equations will be generated appears to the right. Choose either Factors or Dominant Parameters. The screen changes to display the Equations folder, which, has two tables. The upper table displays factor based equations, the lower table displays dominant parameter based equations.
Figure 13 Equations Folder Showing Factor Based Equations
Generate a Parametric Model
Now that the equation coefficients are generated, you can build a variety of statistical models, or save the data in a SPICE equations format for use in circuit simulations. You can test your model, based on a reduced set of parameters, against the raw data to see how well it performs. At this point, IC-CAP Statistics has been designed for flexibility to work with your process.
Parametric analysis can be performed from either:
| • | Factor Equations |
| • | Regression Equations (see Parametric Analysis Results Window) |
Factor Equations
To build the parametric model from factor equations, choose Analysis > Parametric Analysis > Factor Equations, a dialog box appears with three choices:
| • | Monte Carlo |
| • | Corner |
| • | Parametric Boundary |
The advantages and disadvantages of these methods is described beginning with Parametric Analysis Results Window.
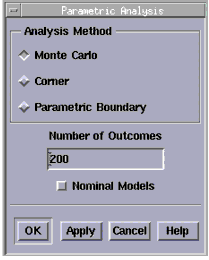
If you select Monte Carlo, you fill in the number of outcomes you want in the field below. If you select Corner or Parametric Boundary, you fill in the number of +/- sigmas you want. When done, choose OK. The Parametric Analysis Results window is displayed.
Parametric Analysis Results Window
Figure 14 Parametric Analysis Results Window
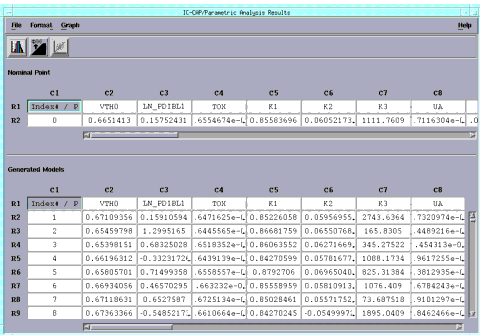
When you perform a parametric analysis, the results are displayed in a window as shown in the previous figure. The upper spreadsheet displays the nominal point of a corner or parametric boundary analysis. The lower spreadsheet contains the rows for the samples (or Monte Carlo outcomes) and columns for the parameters. This window also has menu functions similar to those available in the Parameters folder, and include:
| • | File menu. Save As, Export, Print, and Close. For more information, refer to Saving Data, Exporting Data, Printing, and Closing and Exiting. |
| • | Format menu. Row Height and Column Width. For more information, refer to Changing Row Height or Column Width. |
| • | Graph menu. Histogram, Cumulative Plot, Scatter Plot, and Close All. For more information, refer to Graphing Data. |
| • | Toolbar Icons. Histogram, Cumulative Plot, and Scatter Plot. For more information, refer to Icons. |
Monte Carlo Analysis
Monte Carlo analysis can be used to randomly generate outcomes for the independent parameters in a statistical model (factors or dominant parameters). These random outcomes are then substituted in the model equations to generate a set of correlated models whose statistics (such as means, variances, and correlations) resemble those of the original extracted parameter set. Monte Carlo analysis is very useful for validating a statistical model against the original extracted parameters.
To build Monte Carlo models, choose Analysis > Parametric Analysis. A dialog box appears. Select Monte Carlo and fill in the number of outcomes you want and choose OK. The results of the Monte Carlo analysis are displayed in a spreadsheet window similar to the Parameters folder. The number of rows are equal to the number of Monte Carlo outcomes, and the columns correspond to the model parameters.
You can select a column of data in the Monte Carlo spreadsheet and plot a histogram. Compare this plot (made from synthesized Monte Carlo data) with a plot made from the raw data. Do they agree? (To go back to the raw data, click the Parameters folder tab. Then select a column and choose Graph > Histogram.)
To test the Monte Carlo models, you have to simulate each model and compare the results.
Corner Model Analysis
Corner models are used to synthesize worst-case candidate models for a given model parameter set. This method computes the dependent parameters of a data set to arrive at a set of correlated parameters. Corner models are generated by taking all the +/- n-sigma limits of the independent factors (or parameters). The dependent parameters are then computed by substituting these values into the derived equations. This yields a set of correlated parameters.
To build corner models, choose Analysis > Parametric Analysis. A dialog box appears. Select Corner and enter the number of +/- sigmas (standard deviations) you want. The results are displayed in a spreadsheet window similar to the Parameters folder. The number of rows are equal to 2 n, where n is equal to the number of factors you chose during Factor Analysis. For example, if you chose 10 factors, the table will contain 1024 (210) rows. The columns correspond to the parameters. Each row contains one corner model.
To keep the data set manageable, it is recommended that the number of factors you use to generate corner models be limited to 10.
Note
To test the corner models, you have to simulate each model and compare the results.
Parametric Boundary Analysis
Do not confuse the parametric boundary models, described in this section, with the non-parametric boundary models discussed in the next section.
Note
Traditional worst-case modeling uses corner models. Corner modeling chooses a set of extreme values at the outside of the real multi-dimensional probability density function (PDF) and requires 2 n simulations for an n-dimensional problem.
In contrast, parametric boundary modeling chooses those extreme values at the boundary of the real multi-dimensional PDF, and only needs 2n simulations for an n-dimensional problem. For example, if you chose 10 factors, the number of simulations would be 20 compared to 1024 using corner models.
Boundary modeling circumvents the typically large simulation times required for a Monte Carlo analysis. However, its results are only useful in assessing worst-case behavior, and it does not provide a yield estimate.
To build parametric boundary models, choose Analysis > Parametric Analysis. A dialog box appears. Select Parametric Boundary and enter the number of +/- sigmas (standard deviations) you want. The results are displayed in a spreadsheet window similar to the Parameters folder. The number of rows are equal to 2n, where n is equal to the number of factors you chose during Factor Analysis. Each row contains one boundary model. The columns correspond to the parameters.
Figure 15 Parametric Boundary Models vs. Corner Models In Two Dimensions
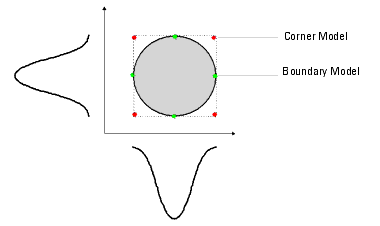
The previous figure compares corner models to boundary models in two dimensions. Using boundary models, you can select four evenly spaced models that lie on an n-sigma boundary of the joint probability density function.
Figure 16 Parametric Boundary Models (Labeled "B") in Higher Dimensions
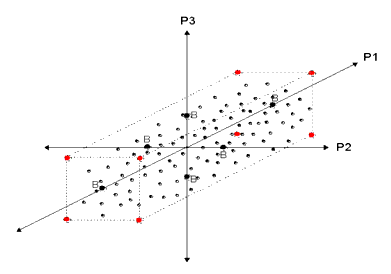
The previous figure shows a graphical representation of parametric boundary models in three dimensions, for parameters P1, P2, and P3. Note that each pair of boundary models lies on the parameter axis (orthogonal space). The values of the parameters on the other axes are at their nominal values. For a three-dimensional probability density function (PDF), you need six boundary models.
Regression Analysis
Unlike correlation analysis, which provides a summary coefficient of the extent of relationship between two variables, regression analysis provides an equation describing the nature of the relationship between two variables.
Regression Equations is one of two methods of performing a parametric analysis; the other method is Factor Equations, refer to Perform Factor Analysis. For more information on Regression Analysis, see Regression Analysis.
To evaluate the regression equations, choose Analysis > Parametric Analysis > Regression Equations, a dialog box appears with four choices:
| • | Parameters Spreadsheet |
| • | Monte Carlo |
| • | Corner |
| • | Parametric Boundary |

These four choices all evaluate the same regression equations. However , each option uses different input values for the dominant parameters (independent variables) in the regression equations.
To use the values of the dominant parameters contained in the Parameters spreadsheet as the input, select Parameters Spreadsheet. These values will be substituted into the regression equations and values of the dependent variables will be computed. Upon completion of analysis, the Parametric Analysis Results window will be displayed with three columns of data for each parameter: the raw or measured data (this is an exact copy of the data in the Parameters spreadsheet), the simulated data (computed from the regression equations), and the residual (difference) between the two. The presence of these three data types (measured, modeled and residual) in a single spreadsheet window makes model validation very convenient. For example, measured versus modeled results can be compared with one another or with the residual error, either graphically or directly from the tabular listing.
The remaining three choices, Monte Carlo, Corner and Parametric Boundary, all require you to provide information on the statistics of the dominant parameters in the regression equations. This information consists of means and standard deviations for every dominant parameter in the regression equations. To enter this information, choose the Input Statistics button to display a dialog box, as shown below.
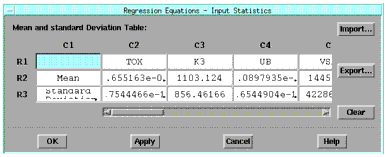
This dialog box displays the dominant parameters as well as default values for the mean and standard deviation of those parameters. The default values are computed from the data in the Parameters folder. From this dialog box you can change this data by typing in the cells, or choose the Import button to import this data from a text file.
When you are ready to build your model, and you select Monte Carlo, fill in the number of outcomes you want in the field below. If you select Corner or Parametric Boundary, you fill in the number of +/- sigmas you want.
When done, choose OK. The Parametric Analysis Results window appears, which shows the results based on the regression equations method using the data you chose. See Parametric Analysis Results Window for details about the menu and toolbar options in this window.