Building a Non-Parametric Model
IC-CAP Statistics contains an exclusive feature called Non-Parametric Boundary Analysis. Unlike other statistical analysis tools, which only handle Gaussian distributions, non-parametric boundary analysis uses a new technique to handle arbitrary data distributions, Gaussian or non-Gaussian, and selects nominal and boundary models. Non-parametric analysis works effectively on data from any stochastic process. The data can be unimodal or multimodal, residing in a single cluster or multiple clusters, with no dimensional limitations.
|
Note
|
|
|
|
|
Do not confuse the non-parametric boundary models, described in this section, with the parametric boundary models discussed earlier.
|
|
The non-parametric analysis starts by selecting a nominal point and choosing boundary points from an arbitrary data collection. The nominal point is the point that has the highest estimated local density and the boundary points are those that have an estimated local density greater than some threshold value. The threshold value is determined by specifying the enclosure percentage that is, under certain circumstances, related to the yield.
To use Non-Parametric Boundary Modeling, choose Analysis > Non-Parametric Analysis. A dialog box is displayed; the next section explains its use.
Non-Parametric Boundary Analysis Example
In Chapter 1, we performed a step-by-step tutorial using IC-CAP Statistics for parametric analysis. Now we will use the same example file to learn how to use Non-Parametric Boundary Analysis.
| 1 |
If it's not already loaded, load the example file bsim3.sdf: Choose File > Examples. In the dialog box that appears, select bsim3.sdf from the list of files that appears and choose OK. The data is loaded into the spreadsheet. |
| 2 |
Optional step (not needed for this example). If your data contains outliers, you should manually deactivate those samples or use automatic data filtering to do the same. Refer to Manually Eliminating Outliers. |
| 3 |
Optional step (not needed for this example). If a given parameter naturally ranges over more than one decade of values (e.g., 10-100), you should choose Data > Data Transformations, and select Natural Log from the dialog box that appears, to transform your data before proceeding. |
| 4 |
Choose Analysis > Non-Parametric Analysis. The Non-Parametric Analysis dialog box is displayed. |
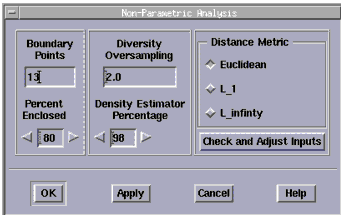
Figure 17 Non-Parametric Analysis Dialog Box
|
|
- The available controls are Boundary Points, Percent Enclosed, Diversity Oversampling, Density Estimator Percentage, and Distance Metric. These controls will be described fully after the example.
| 5 |
For this example, accept the default values. Choose OK. An analysis on the full 31 dimension data set is performed, as shown in the following figure. |
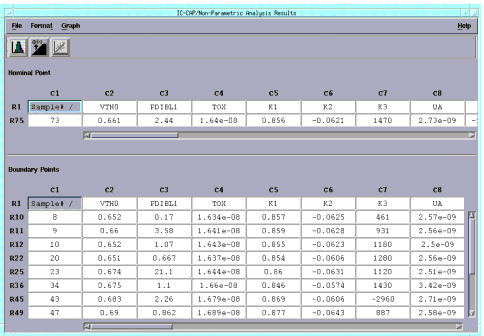
Figure 18 The Non-Parametric Analysis Results Window
|
|
| 6 |
The Non-Parametric Analysis Results window appears, which has two spreadsheets, one for the nominal point and the other for boundary points. The menu and toolbar options in this window are the same those described in Parametric Analysis Results Window. |
- Since we chose the default of 13 Boundary Models for this data set, 13 worst-case models are displayed in the rows of the lower spreadsheet.
- The first row of each spreadsheet contains parameter labels. The row labels are numbered to correspond to the raw data's row number. The first column contains indexes used in plotting. The remainder of each of the spreadsheets contains data specifying each sample's location.
| 7 |
Next, we will perform a new non-parametric boundary analysis, but for only two parameters, VTH0 and TOX. To do this we will deactivate all parameter columns except these two. Select the IC-CAP/Statistical Analysis window, then the Parameters folder. |
| 8 |
Use the horizontal scroll bar to go to the far right column, and select column C37. Scroll back to column C10 and while holding down the Shift key, select column C10. |
| 9 |
Now hold down the Ctrl key and select column C8. This selects columns C8 and C10 through C37. |
| 10 |
Select Edit > Deactivate. |
- We are deactivating most of the parameters for this example so we can plot a two-parameter analysis and look at a boundary. With higher dimensional analyses, where all or most of your model parameters are used, there is no way to visually examine the boundary. However, the program calculates the boundaries and provides you with a selection of worst-case models to simulate.
| 11 |
Select Analysis > Non-Parametric Analysis again and enter the following data in the Non-Parametric Analysis dialog box: |
- Boundary Points: 9
- Percent Enclosed: 80%
- Diversity Oversampling: 3.0
- Density Estimator Percentage: 45
- We changed the Density Estimator Percentage because the distribution is bimodal, with approximately half of the distribution being in each mode. The previous value of 98 is valid for unimodal, Gaussian distributions only.
| 12 |
Choose OK. The Non-Parametric Analysis Results window updates based on the new parameters specified. |
| 13 |
Select the IC-CAP/Statistical Analysis window, and then the Parameters folder. Use the horizontal scroll bar to bring columns C7 and C8 back into view. Select column C7 and continue pressing the mouse button while dragging to column C8. |
| 14 |
Choose Graph > Scatter Plot. A scatter plot of data from the two highlighted columns appears. Maximize the plot. |
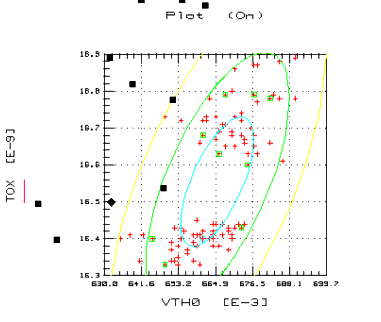
The scatter plot, shown in the following figure, directly illustrates the analysis results. The raw data is marked with crosses, the nominal point with a diamond, and the boundary points with squares. The indirect parametric results can be seen from the ellipses that mark the one-, two-, and three-sigma parametric boundaries.
Figure 19 Scatter Plot Distribution for Values VTH0 and TOX
|
|
The non-parametric nominal point is appropriate because it's in the center of a region that is densely populated, and the non-parametric boundary points form a boundary around the center of both modes or clusters.
The ellipses illustrate the difficulties that parametric boundary analysis has with multimodal, non-Gaussian distributions. Depending of the sigma limit specified by the user, the parameter boundary modeling returns the points where the corresponding ellipse crosses its major and minor axes. In this case, for any of the ellipses drawn, two of the parametric boundary models would be in regions where no data exists. Also the parametric nominal model is at the intersection of the minor and major axes of the ellipses. This point is also in region of no data.
Using the Non-Parametric Analysis Dialog Box
The preceding example was performed to help learn how the use the Non-Parametric Boundary Modeling feature. In this section we will describe the controls you have in Non-Parametric Boundary Modeling and their use. The Non-Parametric Analysis dialog box has the following fields and usage:
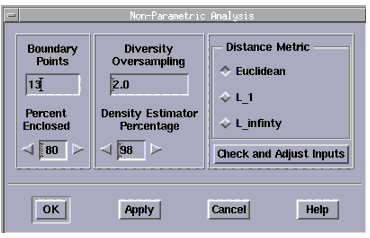
Boundary Points
Choose the number of boundary points you want. The default is a calculated maximum number based on your data set. The number corresponds to the number of worst-case models that will be generated. The minimum is 1. As a rule of thumb, choose a value up to twice the number of parameters you have. Obviously, too high a value will require an excessive number of simulations when you utilize your worst-case models.
Diversity Oversampling
This feature is used to make sure you get an even distribution of points along the boundary. The oversampling value (limit 1.2 to 5.0) multiplied by the number of boundary points equals the number of worst-case candidate models generated for subsequent selection. From these candidates, the program picks a representative set of boundary models.
Percent Enclosed
Enter a number corresponding to the percentage of your distribution you want enclosed by the boundary. Limit 10 to 100. If most of the data points are clustered near the center, with a few outliers near the edges, you might want the boundary to enclose only 50%, for example.
Density Estimator Percentage
The density estimator is a percentage of sample points that are to be used as the nearest neighbors for computing density. The program dynamically sets the limits that can be entered in this field. If you use the left and right arrow keys to enter a number, the value will wrap around the acceptable limits.
Distance Metric
This field has three choices:
These refer to the formula used to calculate the distance between data points. The default is Euclidean. Choosing either of the other options generally will result in slightly different results.
Check and Adjust Inputs
Click this button to check and adjust the inputs of three of the fields in this dialog box, which are constrained together:
If you select this button and the values are acceptable to the program, there is no change. If one or more of the values are out of range with respect to each other, the values in the Boundary Points and Diversity Oversampling fields will be adjusted. The action taken depends on the last field in focus. The Percent Enclosed is never altered.
|