Printing from UNIX
Printing and plotting from IC-CAP on UNIX is accomplished by establishing the desired print setup and then choosing File > Print. The Print Setup and related dialog boxes enable you to:
| • |
Select a printer/plotter other than the default |
| • |
Install additional printers or plotters |
| • |
Set the print resolution (dpi) |
When you select a printer/plotter, you can also change the following default printer/plotter-specific options:
| • |
Duplexing (Double-sided) |
| • |
Orientation (Portrait or Landscape) |
| • |
Color (Black and White or Color) |
When you choose File > Print, you can select from the following additional options:
| • |
Choose to send output to a printer/plotter or print to file |
| • |
Scale the output to fit to the page |
| • |
Select a file format (if printing to file) |
| • |
Specify the number of copies |
Your print setup is saved in $HOME/.Xprinterdefaults. If you do not have a local copy of this file, or the file .Xpdefaults (from a previous release), the default file is read from the $HPEESOF_DIR/xprinter directory. When you change your print setup, the changes are saved (as new defaults) to $HOME/.Xprinterdefaults.
|
Note
|
|
|
|
|
If you do have a file .Xpdefaults (from a previous release), the settings of this file are copied to the new filename to serve as the starting point for your print setup. Both files are valid, depending on which release of IC-CAP you are using. The old file is maintained for running an earlier version of IC-CAP, but the new file is used when you run IC-CAP 2006 (or later).
|
|
Setting Up a Printer
The Print Setup dialog box enables you to setup and manage your printer options. To access the Print Setup dialog box,
| 1 |
Choose File > Print Setup. The Print Setup dialog box appears. |
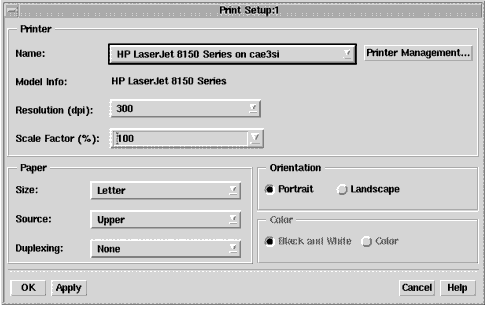
For detailed information on using the Print Setup dialog box, refer to the following table.
Table 51 Using the Print Setup Dialog box
Option
|
|
Printer
|
Use this section of the Print Setup dialog box to define and manage your printers.
|
|
Name:
|
Select a printer from the Name drop-down list. If the printer you want to use is not available in the list, click the Printer Management button. For more information, refer to Managing Printers.
|
|
Printer Management
|
If you want to add, replace, or remove a printer, click the Printer Management button to access the Printer Management dialog box. For more information, refer to Managing Printers.
|
|
Model Info:
|
This section displays the selected printer model information.
|
|
Resolution (dpi):
|
This option enables you to set the print quality (resolution) in dots per inch (dpi).
|
|
Scale Factor (%):
|
This option enables you to set a scaling factor that defines the percentage of normal size by which to enlarge or reduce the document on the page. Default is 100%.
|
Paper
|
Use this section of the Print Setup dialog box to define the paper settings.
|
|
Size:
|
Use the Size drop-down menu to select the paper size. Default is Letter.
Note that paper sizes can vary depending on the paper manufacturer. If you own a printer that provides a specific paper size that you are not familiar with, consult your printer manual for information on the paper size options available. The more common American paper sizes are listed below in inches (Width vs. Height).
Letter = 8.50" (W) x 11.00" (H)
Executive = 7.25" (W) x 10.55" (H)
Legal = 8.50" (W) x 14.00" (H)
Tabloid = 17.00" (W) x 11.00" (H)
Ledger = 11.00" (W) x 17.00" (H)
Consult the International Organization for Standardization (ISO) for standard A through D-sizes as well as RA and SRA-sizes.
|
Source:
|
Use the Source drop-down menu to select the tray that has the paper you want to use. Default is the Upper tray.
|
Duplexing:
|
The Duplexing drop-down menu enables you to print on both sides of the paper. The options available are:
- None - No duplexing, the document will only print on one side of the paper.
- Flip on Short Edge - This option prints on both sides of each sheet and flips the page along the short edge of the paper.
- Flip on Long Edge - This option prints on both sides of each sheet of paper and flips the page along the long edge of the paper.
The default Duplexing option is None.
|
Orientation
|
Use this section of the Print Setup dialog box to define the orientation of your printed page.
|
|
Portrait
|
Click this option if you want your output printed in portrait orientation mode. Portrait is taller than it is wide when you view the text right-side up. Default is activated.
|
Landscape
|
Click this option if you want your output printed in landscape orientation mode. Landscape is wider than it is tall when you view the text right-side up. Default is deactivated.
|
Color
|
Use this section of the Print Setup dialog box to define your color settings.
|
|
Black and White
|
Click this option if you want your output in black and white. Default is activated unless the system detects support for color printer. If this is the case, the system will default to the color option.
|
Color
|
Click this option if you want your output in color. Default is deactivated unless the system detects support for color printer. If this is the case, the system will default to the color option.
|
Managing Printers
The Printer Management dialog box enables you to manage an individual printer or group of printers. To access the Printer Management dialog box,
| 1 |
Choose File > Print Setup. The Print Setup dialog box appears. |
| 2 |
Click the Printer Management button in the Print Setup dialog box. The Printer Management dialog box appears. |
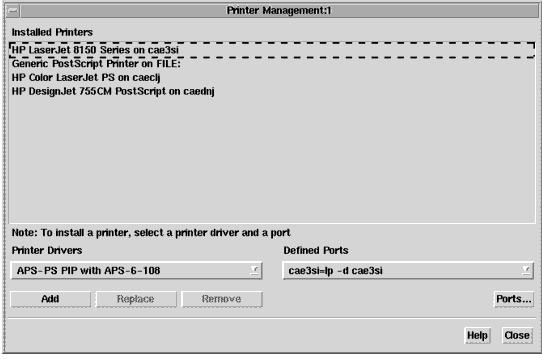
For detailed information on using the Printer Management dialog box, refer to the following table.
Table 52 Using the Printer Management Dialog Box
|
|
Installed Printers
|
The Installed Printers field displays a list of all currently installed printers.
|
Printer Drivers
|
Use the Printer Drivers drop-down list to select a printer driver.
|
Defined Ports
|
Use the Defined Ports drop-down menu to select a defined port.
|
Ports
|
To define a new printer port and/or replace or remove an existing printer port, click the Ports button to access the Ports dialog box. For more information on the Ports dialog box, refer to Defining Printer Ports.
|
Add
|
To install a new printer, select a printer driver and a defined port, then click the Add button. The new printer appears in the Installed Printers list.
|
Replace
|
To replace an existing printer, click the printer you want to replace in the Installed Printers list. Then select a new printer driver and a new defined port. Click the Replace button to replace the printer. The new printer appears in place of the old printer in the Installed Printers list.
|
Remove
|
To remove an existing printer or group of printers, click the printer(s) you want to remove in the Installed Printers list and then click the remove button.
A confirmation dialog box appears asking if you really want to remove the printer. Click OK to confirm or Cancel to abort the removal process. If you click OK, the printer(s) no longer appears in the Installed Printers list.
|
Help
|
Click the Help button to access the online context sensitive help.
|
Close
|
Click the Close button to dismiss the Printer Management dialog box and accept the changes. Settings will be saved upon exit.
|
Defining Printer Ports
The Ports dialog box enables you to define new printer ports and/or replace or remove existing printer ports. To access the Ports dialog box,
| 1 |
Choose File > Print Setup. The Print Setup dialog box appears. |
| 2 |
Click the Printer Management button. The Printer Management dialog box appears. |
| 3 |
Click the Ports button. The Ports dialog box appears. |
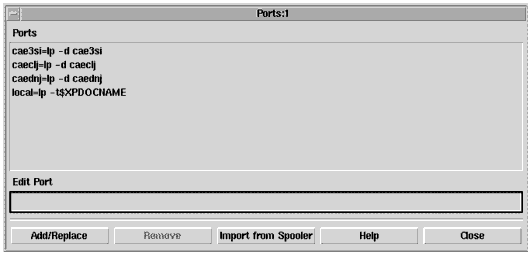
For detailed information on using the Ports dialog box, refer to the following table.
Table 53 Using the Ports Dialog Box
|
|
Ports
|
The Ports field displays a list of ports. Port names can be any names you choose with the exception of FILE: which is a reserved port name.
|
Edit Port
|
The Edit Port field is used to enter a new port. After you have entered the port definition, click the Add/Replace button.
|
Add/Replace
|
Click the Add/Replace button to update the Ports list with contents of Edit Port field.
|
Remove
|
If you want to remove a port from the Ports list, click the port name in the Ports list to activate the Remove button. Click the Remove button to remove the selected port.
|
Import from Spooler
|
Click the Import from Spooler button to generate a list of ports (based on your printcap file).
Note that this third party utility is NOT guaranteed to operate on currently supported platforms.
|
Help
|
Click the Help button to access the online context sensitive help.
|
Close
|
Click the Close button to dismiss the Ports dialog box and accept the changes. Settings will be saved upon exit.
|
Printing to a Printer, Plotter, or File
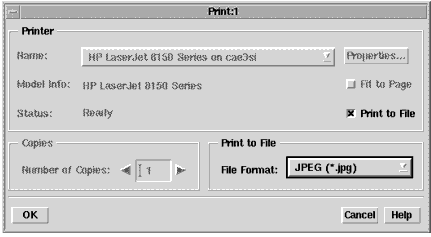
The Print dialog box enables you to output your information to a supported printer, plotter, or specified file. To access the Print dialog box,
| 1 |
Choose File > Print. The Print dialog box appears. |
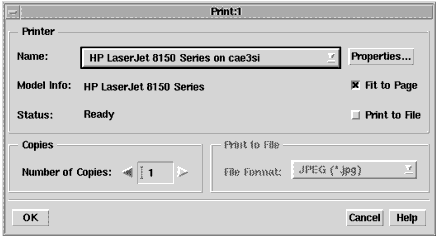
For detailed information on using the Print dialog box, refer to the following table.
Table 54 Using the Print Dialog Box
|
|
|
Printer
|
|
The Printer options in the Print dialog box enable you to define a printer and the output characteristics.
|
|
Name:
|
Select a printer from the Name drop-down list. If the printer you want to use is not available in the list, click the Cancel button and access the Print Setup dialog box.
|
|
Model Info:
|
This section displays the printer model information.
|
|
Status:
|
This section displays information on the printer status. If the printer is ready to print, the Status will display Ready.
|
|
Properties
|
Click the Properties button to view or set additional options used in the Print Setup dialog box. For more information, refer to Setting Up a Printer.
|
|
Fit to Page
|
Activate the Fit to Page option if you want your output to be automatically scaled to fit on the page.
|
|
Print to File
|
Activate the Fit to Page option if you want your output to be directed to a file.
When this option is selected, the Number of Copies feature is deactivated and the Print to File feature is activated.
When this option is deactivated, the Number of Copies feature is activated and the Print to File feature is deactivated.
|
Copies
|
|
This section is used to set the number of copies to print.
|
|
Number of Copies
|
Use this feature to specify the number of copies to print. If Print to File is selected, this feature is deactivated.
|
Print to File
|
|
This section is used to define the type of file you want to send your output to.
|
|
File Format:
|
Use this feature to specify the file format to save your output to.
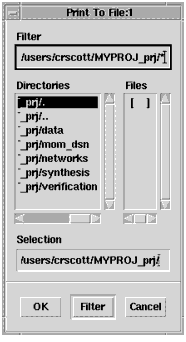
After you have selected your file format, click OK in the Print dialog box. A Print to File dialog box will appear enabling you to define the path and name of the file. For more information on the Print to File dialog box, refer to Printing to a File.
If the Print to File radio button is deselected, this feature is deactivated.
|
OK
|
|
Click the OK button to accept the settings and send your output to the selected printer or file, depending on how you have set your options. Settings will be saved upon exit.
|
Cancel
|
|
Click the Cancel button to dismiss the Print dialog box. Settings will not be saved upon exit.
|
Help
|
|
Click the Help button to access the online context sensitive help.
|
Printing to a File
The Print to File dialog box enables you to define a destination path and file name and then output your information to the specified file. To use the Print to File dialog box,
| 1 |
Choose File > Print. The Print dialog box appears. |
| 2 |
Select the Print to File option in the Printer section of the Print dialog box. Notice that when you select the Print to File option, the Print to File section is activated enabling you to select a file format. |
| 3 |
Use the File Format drop-down list to select the desired file format. Options include JPEG, GIF, PDF, Bitmap, and HP-GL/2. |
| 4 |
Click OK in the Print dialog box. The Print to File dialog box appears. |
| 5 |
Enter the file name for your output in the Selection field. |
| 6 |
Click the OK button to output the file. |
|


