Printing from the PC
This section describes some of the actual printing features available on the PC. For information on basics (such as adding a printer), refer to your Windows documentation.
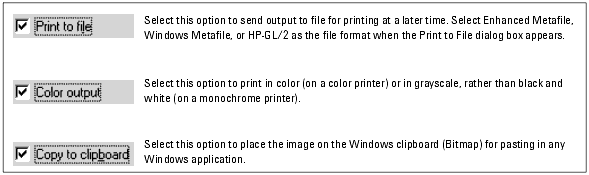
Printing from IC-CAP on the PC is accomplished by establishing the desired print setup and then choosing File > Print. Listed below are some of the more common options you can set through the Print Setup and related dialog boxes:
|
Note
|
|
|
|
|
The options available vary based on the printer/printer driver you select.
|
|
| • |
Printer (select any installed printer) |
| • |
Single- or two-sided printing |
When you choose File > Print, you can select from the following additional options:
Establishing a Print Setup
To establish a print setup:
| 1 |
Choose File > Print Setup. |
| 2 |
Select the desired printer from the drop-down list. |
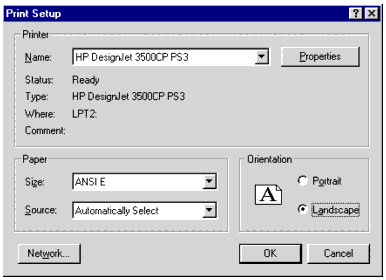
| 3 |
Change any of the options here as desired, or click Properties to set additional options, such as Scaling. Note that the appearance of the Properties dialog box varies depending on the selected printer. |
| 4 |
Change any other options as desired and click OK to dismiss the Properties dialog box. |
| 5 |
Click OK in the Print Setup dialog box and you are ready to print. |
Basic Printing
To send the entire contents of the window to the printer:
| 1 |
Choose File > Print and a dialog box appears. |
| 2 |
Change any print options as needed, and click OK. |
|