Print version of this Book (PDF file)
RF Measurement
This section provides information on RF measurements using the BSIM3/BSIM4/PSP Modeling Packages. Starting the RF module opens a GUI divided into a number of folders for each task. The top row icons are the same as in the DC and CV measurement module. Assuming that you are already familiar with the functions of these buttons, we will not describe their purpose. You can easily check their use in DC and CV Measurement of MOSFET's for the MOS Models.
RF Measurement Notes
The RF measurement module also contains a Notes folder to take notes on the project. It has the same look as the Notes folder of the DC/CV-measurement module, see Project Notes.
RF Measurement Conditions
The first task during RF modeling is to set up measurement conditions. Use the Measurement Conditions folder shown in the following figure to enter the measurement conditions at which you would like to measure and extract RF parameters.
Figure 26 Measurement Conditions folder
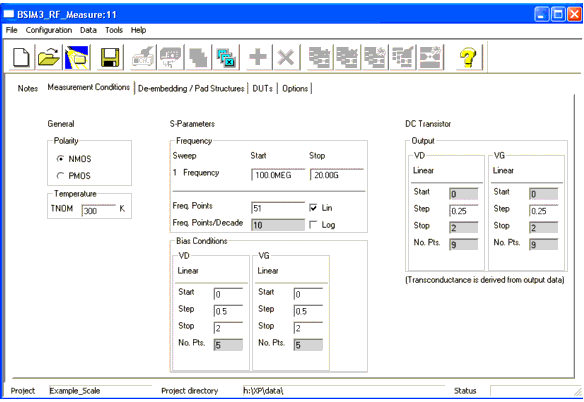
Select the Polarity of the transistor to be measured (NMOS or PMOS) using the appropriate check box. Enter the measurement temperature TNOM, if the measurement is being conducted at any other temperature than the default of 300K.
The DC Transistor fields in this folder enable you to set sweep values for gate and drain voltages respectively. Enter Step values for the Output fields.
The purpose of this field is to define measurement of DC characteristics of multifinger transistors used for RF NWA measurements. This step is necessary, since the DC behavior of a multifinger transistor differs from that of a single finger transistor. During DC measurement and extraction, a single finger transistor is being used, whereas a multifinger transistor is used in RF measurements to deliver sufficient drain currents for network analyzers to improve the measurement accuracy. Actual transistor DC measurements are used to set start points for S-parameters at low frequencies and control extraction at those points.
Figure 27 S-parameter part of the Measurement Conditions folder
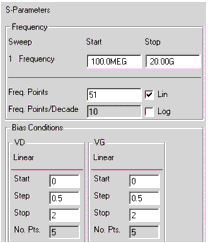
The Measurement Conditions folder provides fields to enter conditions for S-Parameter measurements. Enter Start and Stop frequency, choose the desired sweep (Linear or Logarithmic) and enter the number of Frequency Points to be measured during linear sweep or the number of Frequency Points/Decade for logarithmic sweep. Only the field ahead of the chosen sweep type (Lin or Log) is enabled allowing data to be entered.
Use the field Bias Conditions to enter sweep voltage Start, Step, and Stop values for drain and gate voltages during S-Parameter measurements.
For extraction purposes, VD/VG steps should lead an integer value.
Be careful not to exceed the maximum DC Input voltage of the Network Analyzer used during measurements!
Note
De-embedding/Pad Structures
The De-embedding/Pad Structures folder enables you to select the type of pad structure used for de-embedding the parasitics of the measurements. Measurement of the transistors for parameter extraction requires connecting the devices to the instruments. Therefore, the basic transistor element to be measured must be connected using pads and metal connections on the wafer. In order to get the parameters of the basic transistor without metal connections and pads, the parasitics must be de-embedded from measurement results. A device library should contain only the basic transistor element. The connections to other elements in a circuit have to be modeled separately since this is part of the interconnection between elements on a chip.
Basically, you perform error correction of your network analyzer in order to eliminate measurement errors resulting from cable connections used to interface the analyzer to the wafer prober and up to the probe tips. Your test chip design must contain structures to eliminate the parasitics as a result of connecting prober needles via metal lines to transistor terminals.
This folder is intended to define the structures used to de-embed the transistor parameters from measured ones.
Additional icons are visible when choosing this folder. They are designed to Add, Delete, Verify or Configure De-embedding sets, and are displayed in the following figure from left to right.
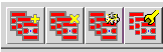
Figure 28 De-embedding pad parasitics
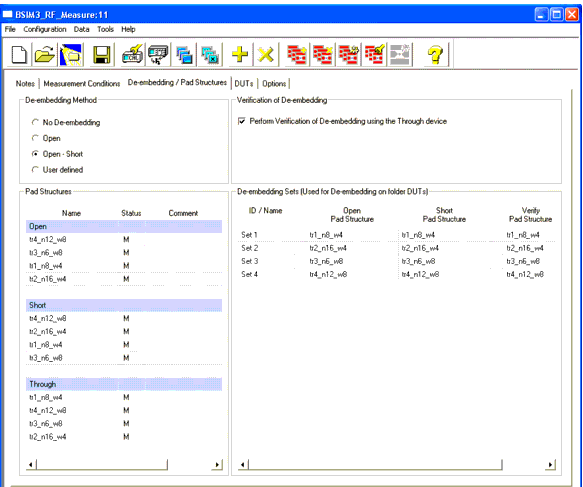
The section De-embedding Method provides check boxes to select the method for de-embedding to be used. Check one of No De-embedding, Open, Open-Short, or User defined. Your selection of the de-embedding method will affect the definition of de-embedding sets described later in this paragraph.
There is a section Verification of De-embedding where you can check a box to perform verification of de-embedding using the through device, if applicable.
The field Pad Structures is intended to declare dummy pads for de-embedding purposes. Click the Add icon and select the type of pad by clicking Open, Short, or Through on the appearing window, see below.
A new line will be inserted inside the field Pad Structures. You can change the name of the dummy pads as you like. The following rows are showing the status (not measured, showing "0", measured, showing "M" or not applicable, showing "-") as well as a user comment.
The Data > Measure menu is used to perform the measurement of the defined pads. Or you can press the Measure icon and select the pad you would like to measure in the appearing Measure form before clicking Measure DUT.
After the measurement has been performed, plots can be displayed using the appropriate icon or menu function, so that the measured results could be checked for plausibility of the measured data. Click the Close Plots icon to close the displayed plots of measured pads.
You can view the measured pad data at any time after a measurement has been performed by clicking Display Plots under the Data menu, or the appropriate icon, then selecting the pad to be displayed. The data will be displayed on Smith charts and can be closed using the Close Plots icon or the Data menu.
If you have chosen to perform a Verification of de-embedding by activating the Perform Verification of de-embedding Using... check box on the top right part of the folder, the field De-embedding Sets is being activated and you are able to configure the sets for use within the DUTs folder. Save the settings before configuring de-embedding sets.
A de-embedding set actually is a combination of pad structures to be use for de-embedding of measured devices. They can be used for one or more devices and can consist of any available pad structure.
Click the Add De-embedding Set icon once for each set to be used. A line for each set will be added. You are able to overwrite the predefined name of the sets.
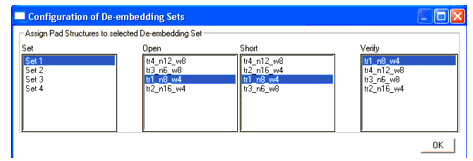
Click the Configure/Allocate icon to assign a pad structure to a selected de-embedding set on the Configuration of de-embedding Sets form. Depending on the type of de-embedding you have chosen (No de-embedding, Open, Short or User Defined) in the De-embedding Method part of this folder, you are able to assign the respective pads to the sets. In other words, if you select Open as the de-embedding method, you can passing only pads of type Open to selected de-embedding sets. If you select Open-Short or User defined, you are able to assign pads of type Open, Short and Through to a set.
You can select the check box Perform Verification of De-embedding using the Through device if you have a Through device available on your test chip. Only after activating the verification, you can click the Verify Set icon to perform the verification of a selected set.
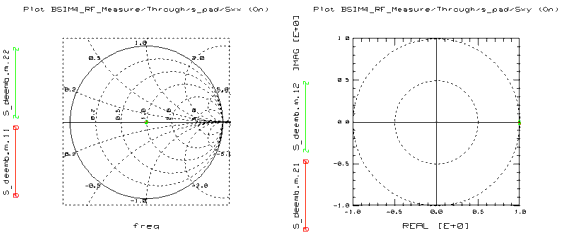
The S-Parameters should behave like an ideal matched transmission line with
S11 and S22 should be concentrated at the center of the Smith chart, while S21 and S12 both start at
Note
![]() and a time delay
and a time delay ![]() representing the electrical length of the TROUGH device measured.
representing the electrical length of the TROUGH device measured.
![]() and turn clockwise on the unity circle. If this is not true, the following items should be checked:
and turn clockwise on the unity circle. If this is not true, the following items should be checked:
•
Is the calibration OK?
•
If the OPEN method is used: De-embedding quality can be enhanced by switching to the OPEN-SHORT method.
•
For very high frequencies (approximately above 30 GHz) the assumptions for using the OPEN-SHORT method might not be given. You should probably change to an alternate calibration method.
The verification will be done and the plots will be displayed after clicking OK on the upcoming message window. The following plots show what is to be expected for correct de-embedding.
An error message will show up if one of the sets is not configured correctly.
After the de-embedding is done, you can assign the appropriate pad sets on the DUTs folder to their respective devices.
De-embedding of Parasitic Structures
The section Test Structures for CV Measurements describes the effects of de-embedding. It is intended to give you an insight into de-embedding methods and describes the results of S-Parameter measurements with and without de-embedding.
DUTs
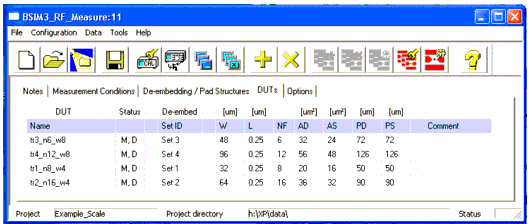
The DUTs folder is used to define transistor geometries for the DUT to be measured. Following the column for entering the name of the DUT, there is a column showing the status of the DUT. This column shows "0" if no measurement and de-embedding has been performed. It changes to "M" if a measurement has been performed and to "M, D" if measurement and de-embedding has been done. The geometries to be entered into the following columns are Width and Length of the transistor, Number of transistor Fingers (NF), Drain and Source Area and Perimeter Length (AD, AS, PD, PS). If the appropriate check boxes are checked or if the menu item Configuration > Geometric Entries has been set to GEOMOD=0, RGEOMOD=0 or NRS=0, NRD=0 and so on, the model selectors GEOMOD and RGEOMOD appear as a column (applicable to BSIM4/PSP only), and are set to their default values (0). The columns NRS, NRD and MIN are originally BSIM4 parameters, but are used also inside the extended BSIM3 model from AdMOS.
W, AD, AS, PD, and PS are total values including all fingers of the device!
Note
There are two newly introduced instance parameters: Blocks (Number of Blocks) and NGCON (Number of Gate contacts). The Blocks parameter is actually a multiplier for the transistor. The other parameters (L, W, AD, AS ...) refer to Blocks = 1. The second new parameter, NGCON, defines the number of Gate contacts a transistor actually has, thus reducing resistance, for example. Those parameters can be activated or deactivated using the menu Configuration > Geometric Entries. By default, both parameters are on and set to 1. If they are set to off, the columns inside the DUTs folder will not be present.
The DUTs folder looks the same for BSIM3 and BSIM4/PSP. However, this folder contains some parameters and model flags that are only applicable for BSIM4/PSP. The default values for parameters not used in BSIM3 are set in such a way, that BSIM3 ignores them. This is done to make the form compatible for both models.
Note
In BSIM4, the model selector GEOMOD is used to select a geometry-dependent parasitics model that specifies whether the end source/drain diffusions are connected or not. The default value is (0) — not connected. The parameter RGEOMOD is the source/drain diffusion resistance model selector. It specifies the type of end source/drain diffusion contact type: point, wide or merged contact. The default value is (0) — no source/drain diffusion resistance. See the BSIM4 manual from UC Berkeley [1] on page 11-5 and 11-6 for a definition of GEOMOD and RGEOMOD model selector values.
The parameters NRS, NRD and MIN are the layout dependent parameters Number of Source/Drain diffusion squares and Minimization of diffusion squares for even numbered devices. They are set to their default values (0), too.
The last column enables you to enter a comment for this DUT.
Figure 29 DUTs folder, all options are activated
There are icons to Calibrate the network analyzer, to start a Measurement using the Start, Stop and Step definitions on the measurement setup folder, to Add or Delete DUTs, to Configure the De-embedding, and to De-embed All DUTs. To Clear measured data or to Synthesize data, use the Data menu. Once a DUT has been measured completely, the Status column will change from "0" to "M" to show the state of measurement.
Synthesize data performs a simulation of S-parameters, using the frequency definitions on the DUTs folder and a set of parameters loaded into the program from any other extraction task, to see correlations or to extract parameters into BSIM4 from another model release.
A De-embedding task starts with configuration before de-embedding the measurement setup (De-embed All). Click Configure/Allocate to assign a de-embedding set defined on the De-embedding/Pad Structures folder to a specific DUT. You will get a list of DUTs and de-embedding sets defined for assignment.
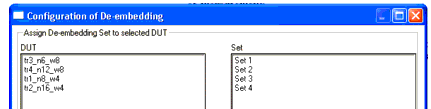
Click the DUT, then click the SET to be assigned to the selected DUT.
Click the De-embed All icon to start de-embedding measured data for each DUT with a de-embedding set assigned.
The Display Plots icon is intended to check the measurement results in the form of diagrams, using the settings made on the Options folder. You can Display and Close Plots using the appropriate icon for this task.
Select the plots you would like to see or view all plots in one window.
RF Measurement Options
Using this folder, you can set the size of the plot window to fixed. See Options for details.