Print version of this Book (PDF file)
Adding a Simulator
The IC-CAP Open Simulator Interface allows the addition of any simulator to IC-CAP. The following figure shows a data flow diagram of this interface.
In this design, the IC-CAP system has no knowledge of your simulator. The circuit description is entered in the format corresponding to the template name in the usersimulators field (2nd argument).
spice2
spice3
hpspice
hspice
eldo
spectre443spice
mns (obsolete)
mns
spectre
spmodeadsspectre
saber
saber
hpeesofsim
hpeesofsim (ADS)
These simulators are referred to as the template simulators when writing interface code. For example, when you specify a circuit description with syntax matching the syntax of spice2, then spice2 is referred to as the template simulator.
Figure 21 IC-CAP Open Simulator Interface Data Flow Diagram
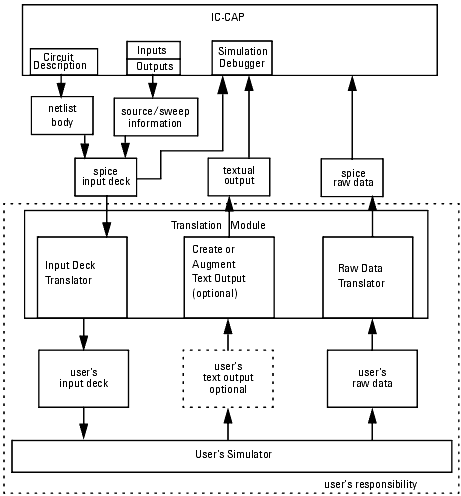
IC-CAP generates the input deck as if the selected simulator were the template simulator. When you enter your simulator in the Select Simulator dialog box or the SIMULATOR variable, the input deck is sent through a module of code that you have written. This module of code is referred to as the Translation Module in the figure. The Translation Module consists of two translators. The first translates the IC-CAP generated input deck to your simulator's input deck. The deck is then sent to your simulator for analysis. When the simulation is completed, the second translation accepts your simulator's raw data and converts this to the raw data format of the template simulator. This data is returned to IC-CAP for evaluation.
Starting with IC-CAP 2002 PC and IC-CAP 2004 UNIX, you can specify whether the simulator returns the raw data in big-endian or little-endian format. If you do not specify a format, IC-CAP assumes that the data is returned in the order native to the platform, which is big endian for UNIX and little endian for the PC. To specify big endian, append .be or the alias .hpux or .sparc to the template name. To specify little endian, append .le or the alias .pc to the template name. For additional information, see the README.byteorder file in the source directory $ICCAP_ROOT/src directory.
It is possible to have a circuit description in the native syntax of the simulator that you will use. This is done by using the Open Circuit Parsing Interface that is available in IC-CAP. Though the netlist body is provided in your selected simulator's native syntax, the source and sweep information that IC-CAP adds to the netlist body is still in the template syntax. To use this interface, you must specify the name of the executable responsible for generating the netlist body.
When the Simulation Debugger is running, the file displayed as the input file is the template simulator's input deck generated by IC-CAP. The Simulation Debugger's output file can be any text file generated in the Translation Module section of code. This allows many options with respect to what information can be included in this text file that may be helpful for debugging purposes.
The Translation Module section of code consists of the two translators, but may also include any other desired functionality. For example, you may read the text file back from your simulator and send this file back to IC-CAP to be displayed in the Simulation Debugger's output file. The Translation Module can also be written to generate debug statements in a text file to show the progress of the input and output translations. This text file can then be sent to IC-CAP and displayed in the Simulation Debugger's output file.
As part of the interface code, you are supplied with a file called usersimulators in the directory $ICCAP_ROOT\iccap\lib. This file must contain the user-specified information for each simulator added to the IC-CAP system. Five fields of information must be specified when adding a user simulator to IC-CAP. The fields of information must be separated by a space. The fields may or may not be surrounded by quotation marks. A blank, such as host_name, is indicated by a pair of quotation marks (""). An optional sixth field is available to use the Open Circuit Parsing Interface.
The general format is as follows:
simulator_name template_name path_name host_name pipe_capability [parser_path][special_path]
- where:
- simulator_name is the name of the user simulator being added to the list. This is the name you will specify when selecting the simulator in the Select Simulator dialog box or the SIMULATOR variable. You may assign any name to this field EXCEPT for any of the reserved IC-CAP template names. The reserved template names are shown in Table 10.
- template_name is the name of the template simulator. The user-written translation modules map the input file format of the user's simulator to the input file format of the template simulator. Likewise, the output file format of the template simulator is translated into the output file format of the user's simulator. To specify that the simulator returns the raw data in big endian format, append .be or the alias .hpux or .sparc. To specify that the simulator returns the raw data in little endian format, append .le or the alias .pc.
- path_name is the complete path name of the user's simulator executable file or translation module. Use back slashes when naming the path to a simulator on a PC and forward slashes when naming the path to a simulator on UNIX.
- host_name is the host machine name on which the simulator can be used. The purpose of this information is for remote simulations where only a particular computer is able to access a simulator. If this field is blank, indicated by a pair of quotation marks (""), the simulation is executed on the machine currently running IC-CAP. The format of host_name is <host> [<tmp_dir>], where <host> is any host name permitted by rsh and remsh. Examples include remotebox, remotebox.my.com, 192.168.4.4, and icuser@remotebox. The last form enables users with sufficient permission to simulate to the machine remotebox as if the user icuser was performing the simulation. This is useful when simulating to a UNIX machine from a PC when the login names for the PC don't match the login names for the UNIX machine. <temp_dir> is optional and it enables you to specify a location for IC-CAP's temporary files. The default location is /var/tmp on the remote machine. For example, if a PC is running services and it meets the requirements in Network Security, /var/tmp (UNIX notation) may not work for the PC. You can override this by specifying something like c:\temp\. For more information, see Remote Simulation.
- pipe_capability is either CAN_PIPE or CANNOT_PIPE. It specifies whether or not the simulator has the ability to perform piped simulations. When CANNOT_PIPE is specified in this field, a non-piped simulation is done even when the IC-CAP simulation debugger is off.
- parser_path is an optional entry that specifies the name of the executable responsible for generating the netlist body and providing IC-CAP with the necessary parameter/node information.
- special_path is a simulator-specific field and may have different meanings for each simulator. Currently it is only required by the saber interface and will be ignored for any other simulator template. The field can be completely omitted from all templates but saber. For saber, it should provide the path to the aimsh executable in your saber installation. Note, to specify this field without declaring a parser_path, you must specify two quotations "" for the parser_path field.
- simulator_name is the name of the user simulator being added to the list. This is the name you will specify when selecting the simulator in the Select Simulator dialog box or the SIMULATOR variable. You may assign any name to this field EXCEPT for any of the reserved IC-CAP template names. The reserved template names are shown in Table 10.
Using the Open Circuit Parsing Interface
To use the interface and generate a circuit description in the native syntax of the simulator, you must specify the executable in the usersimulators file. This optional field in usersimulators is the path to the circuit parser. This enables the simulator link to use your simulator's native syntax in IC-CAP's circuit description shown in the Circuit folder. Without this interface, your circuit must be represented as spice, hpeesofsim, or sabre. If you specify an executable, it is responsible for the following actions:
| • | Creates a parsed_file that IC-CAP will use to merge parameters at each simulation. |
| • | Identifies all pertinent parameters for in the DUT Parameters and Model Parameters folders. |
| • | Identifies the number and names of all nodes that will be used in IC-CAP. |
Your parser will be invoked with two arguments, the source file name and the output file name. The parser is responsible for generating the output file which is the same as the input file with substitutions for node names, parameters, and model names. In addition, the circuit type must be declared.
Determining the circuit type differs depending on the template being used. For any of the spice templates, the netlist should consist of one instantiation of one model or a subcircuit.
 <instance line>
<model card>
 .subckt
.
.
.ends
The first should be declared a circuittype of the first character of the instance line. The second should be declared a circuit of type X. The instance line should be omitted from the output file as IC-CAP will generate this line with the proper node numbers for the type of simulation being performed.
For hpeesofsim simulations, the circuit is similar, either a subcircuit, or a model and an instance. circuittype for a subcircuit is still X, but for the instance netlist, the type is always D.
For saber simulations, circuittype is again a D for device netlists and an X for subcircuit netlists, but for this template, you must set device type as well which is the actual name of the device type.
The output file should place the token $ where the name of the model should appear in the netlist. It should place the token <name>$ where the value for parameter named <name> should appear.
 Example Device circuit:
D1  1 = A  2 = C  DIODE
.MODEL DIODE D
+ IS = 1E-14
+ N = 1.0
+ BV = 1000
+ IBV = 1m
+ RS = 0
+ CJO = 0
+ VJ = 1.0
+ M = 0.5
+ FC = 0.5
+ TT = 0
+ EG = 1.110
+ XTI = 3.0

Output File:
.MODEL $modname$ D
+ IS = $pvalIS$
+ N = $pvalN$
+ BV = $pvalBV$
+ IBV = $pvalIBV$
+ RS = $pvalRS$
+ CJO = $pvalCJO$
+ VJ = $pvalVJ$
+ M = $pvalM$
+ FC = $pvalFC$
+ TT = $pvalTT$
+ EG = $pvalEG$
+ XTI = $pvalXTI$

Example subcircuit circuit
.OPTION gmin=1e-30
.SUBCKT LED 1=A 2=C
RS  1 11 1m
DLO 11 2 DLO
DHI 11 2 DHI
.MODEL DLO D
+ IS  = 1E-29
+ N   = 1
.MODEL DHI D
+ IS  = 1E-34
+ N   = 1
+ CJO = 100p
+ M   = .4
+ VJ  = 2
+ FC  = .5
.ENDS

Output File:
.SUBCKT $modname$ 1 2
RS 1 11 $pvalRS$
DLO 11 2
+ DLO
DHI 11 2
+ DHI
.MODEL DLO D
+ IS = $pvalDLO.IS$
+ N = $pvalDLO.N$
.MODEL DHI D
+ IS = $pvalDLO.IS$
+ N = $pvalDLO.N$
+ CJO = $pvalDLO.CJO$
+ M = $pvalDLO.M$
+ VJ = $pvalDLO.VJ$
+ FC = $pvalDLO.FC$
.ENDS
The parser must print the commands to standard output that tell IC-CAP about the circuit it has parsed. Each line must meet one of the following formats:
- DEVPARAMs and DEVMODELPARAMs are parameters that are to appear at the DUT level. The difference between DEVPARAMs and DEVMODELPARAMs are that DEVMODELPARAMs appear in model cards.
- MODELPARAMs are PARAMs that appear in model cards. PARAMs and MODELPARAMs appear in the model parameters page.
- <name> is the name of the model. <value> is its default value.
- For certain saber parameters that can be altered, you may prepend SPECIAL to any of the PARAM keywords.
- MODELPARAMs are PARAMs that appear in model cards. PARAMs and MODELPARAMs appear in the model parameters page.
- Each NODE line declares a node to be recognized in IC-CAP setups. The order of the NODE lines must match the order the nodes are to appear when IC-CAP instantiates the instance card.
- Here <x> is the name of the device for a device type circuit. See discussion about circuit types. This line is only required for saber.
- Here <x> is the name of a model which was referenced in the netlist, but had no associated model card. In this case IC-CAP will try to find a model in its loaded list of models to insert.
- Here <x> is any arbitrary error message. The space after the colon is required. The entire line, including ERROR: will be reported in an error dialog.
- This should be the last line issued indicating that the parse was successful and that the output file has been generated.
Translation Module Example
An example translation module, $ICCAP_ROOT/src/mysim.c, is provided with IC-CAP. The executable version of this program is $ICCAP_ROOT/bin/mysim. The following line is an example for adding a simulator called mysim to the IC-CAP simulator list:
mysim spice2 $ICCAP_ROOT/bin/mysim "" CAN_PIPE
- where:
- The simulator mysim uses spice2 as the template simulator.
- mysim is a user-written module that does the following:
- The simulator mysim uses spice2 as the template simulator.
| • | Translates a spice2 input format deck to a mysim input format deck. |
| • | Makes the call to the user's simulator. In this example, the executable simulator is spice2. |
| • | Translates the user's binary output format to spice2 binary output format. |
| • | Optionally sends information to the output text file. |
- mysim is located in the $ICCAP_ROOT/bin directory.
- The current host computer can perform a mysim simulation. The quotation marks ("") mean that no remote host is specified and therefore the simulation can be done on the current host machine.
- The simulator mysim is capable of piped simulations.
- The current host computer can perform a mysim simulation. The quotation marks ("") mean that no remote host is specified and therefore the simulation can be done on the current host machine.
After creating a translation module, you must compile it, using the system command:
cc -o mysim mysim.o -lm
Reserved Simulator Names
The following simulator names are reserved by IC-CAP and you cannot assign the same name to a different simulator:
The following simulator names are defined in the usersimulators file but you can change their name and assign the same name to a different simulator.
Simulator Argument Syntax
The command syntax for each simulator differs depending on whether a piped or non-piped simulation is being invoked. For details, refer to the Reference manual.