Installing IC-CAP
IC-CAP can be installed on a PC running Windows using either the IC-CAP installation CD or by downloading the IC-CAP installation image from the Agilent EEsof Knowledge Center website:
- http://www.agilent.com/find/eesof-knowledgecenter
For last-minute program and documentation information, refer to the Release Notes document on our website at:
- http://www.agilent.com/find/eesof-docs/
Choose IC-CAP 2008 > Release Notes.
Installation Procedure Overview
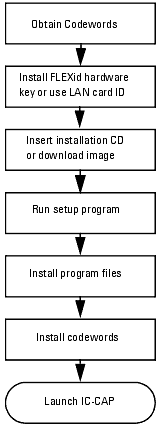
Installation Steps
Use the following steps to install IC-CAP on a PC running Windows. If you have not done so, please review Before You Begin. Also, if you installed a pre-release Beta version of IC-CAP, you should uninstall it before loading this release.
To Install IC-CAP on Windows:
| 1 |
Exit all Windows programs and insert IC-CAP installation CD into your CD-ROM drive or download the IC-CAP installation image from the Agilent EEsof Knowledge Center website: |
- http://www.agilent.com/find/eesof-knowledgecenter
| 2 |
If you downloaded the installation image, navigate to where you saved the file then double click the self-extracting file to unzip it. |
| 3 |
If the Setup program does not start automatically, choose Start > Run and enter D:\setup, where D: is your CD-ROM drive or the path to the unzipped files, then click OK. |
| 4 |
At the Welcome screen, choose Next to read the License Agreement. This is a usage agreement and is not related to the license codewords required to run the software. You must accept the agreement to continue with the installation. This appears only when you run Setup the first time or after uninstalling IC-CAP. |
| 5 |
At the License Agreement screen, after reviewing the agreement, choose either: |
| |
• |
I accept the terms of the license agreement |
| |
• |
I do not accept the terms of the license agreement |
- then click Next to continue with the setup or Cancel to end the setup program.
| 6 |
At the Installation Directory screen, choose: |
| |
• |
Next to install to the default destination. |
| |
• |
Browse to specify a different destination folder. If you specify a folder that does not exist, the installation program will ask if you want to create it. |
|
Note
|
|
|
|
|
Using network drives (disk space that physically resides somewhere other than inside the PC running IC-CAP) can degrade performance in a variety of ways. For best performance, install IC-CAP on the local PC with the HOME folder also on the local PC. Do not select a network drive using File > Change Directory. Ensure your temporary disk space is not on a network drive (see Table 9, "System Environment Variables"). Performance problems include, but are not limited to slow:
| • |
UI response when opening file browsers |
|
|
| 7 |
At the Home Directory Settings screen, choose: |
| |
• |
Next to accept the default. |
| |
• |
Browse to specify a different folder. |
- The folder you specify will be the default startup folder for IC-CAP. It will also be used to store the configuration data in a subfolder called hpeesof. The path for the home directory cannot contain any folder names that use a space. For example, do not set the home directory to C:\My Home\IC-CAP 2008. If you are using more than one IC-CAP version, please choose a new Home folder for each version. For the best performance, choose a folder on your local, not network, drive.
| 8 |
At the Folder Options screen, choose either: |
| |
• |
Create folder and shortcuts only for current user |
- or
| |
• |
Create folder and shortcuts for all users (default) |
- then type in a new folder name or click Next to accept the default folder name.
| 9 |
At the summary screen, review your choices then choose: |
| |
• |
Back to access previous screens to verify entries and make changes. This screen appears again if you go back to make other choices. |
| |
• |
Install to begin the installation. |
| |
• |
Cancel to exit the Setup without completing the installation. |
- Immediately after you click Install, the program starts copying files. The status screen displays the files being installed and shows the installation progress.
| 10 |
At the FLEXid screen, choose: |
| |
• |
Yes to install a FLEXid dongle (hardware key) for licensing. |
| 11 |
After reading the information about how to obtain licenses or codewords to run IC-CAP, click Finish. |
| 13 |
Install the Macrovision FLEXid software-security hardware key to your PC's parallel port or use your PC LAN card's ethernet ID. For instructions, refer to Installing Your Licenses. |
| 14 |
To use the instrument control features in IC-CAP, install a GPIB interface as well as all required drivers supplied with the interface. |
Installing from a File Server
The contents of the IC-CAP CD or downloaded and unzipped installation image can be copied to a file server PC enabling you to install IC-CAP from this file server. This arrangement is useful for doing silent installations (see Silent Installations). The following steps explain how to set up the file server and run the installation on client PCs. Agilent EEsof recommends that you use Windows Explorer to create folders and copy files in this procedure.
| 1 |
On the file server PC, create an IC-CAP2008 folder with a cdrom subfolder on a sharable hard disk. |
| 2 |
If installing from a CD, insert the IC-CAP PC installation CD into the file server's CD-ROM drive. If the Setup program starts automatically, cancel it at your first opportunity. |
| 3 |
Either copy the contents of the CD into the folder C:\ICCAP2008\cdrom or unzip the installation image into the folder C:\ICCAP2008\cdrom. |
- To ensure coping all files, select the CD-ROM drive in Windows Explorer, and choose Edit > Select All, then Edit > Copy. Next, select the cdrom folder and choose Edit > Paste.
| 4 |
On the file server PC, share the folder C:\ICCAP2008. |
- In Windows Explorer, select the folder, then choose File > Properties. Select the Sharing tab, and complete the information. Click OK.
| 5 |
For each client PC on which you want to install IC-CAP, map the client to the folder ICCAP2008 on the file server PC. In Windows Explorer, choose Tools > Map Network Drive and complete the information. |
| 6 |
On the client PCs, run setup.exe from the mapped network drive. You may run the normal installation described in Installation Steps, or the silent installation described in Silent Installations. |
Silent Installations
The InstallShield program provided with IC-CAP supports a silent installation. A normal (non-silent) installation receives the necessary input from the person installing the software in the form of responses to prompts in dialog boxes. However, a silent installation does not display prompts for inputs. Instead, a silent installation gets inputs from a response file.
Silent Installation Overview
To set up and run a silent installation on a Windows PC for IC-CAP 2008:
| 1 |
On a server PC's sharable hard disk, copy the contents of the IC-CAP installation image (from CD or downloaded and unzipped) to a folder. Details about setting up a file server are described in Installing from a File Server. |
| 2 |
Share this folder and map the folder to a client machine. |
| 3 |
On client PCs, run the setup.exe utility using arguments for a silent installation, including the path and file name of the response file. |
| 4 |
If needed, run a silent uninstallation to remove IC-CAP from client PCs. |
Response File Contents
The response file provides the inputs automatically during silent installations. The command to execute a silent installation includes the path and file name of the response file. Using our example location for the installation contents, the sample response.txt file is located in the ICCAP2008\cdrom\silent folder.
The response.txt file supplies the following inputs requested by the installation program:
| • |
Installs IC-CAP 2008 into the folder C:\Agilent\ICCAP_2008. |
| • |
Places shortcut icons for the Start menu in a default location. |
| • |
Sets the home folder to C:\users\default. |
If you want to change these settings, copy the sample response.txt file then edit the file being careful to change only the settings in question to avoid corrupting the file:
| • |
To change the installation folder, change |
| |
• |
-P installLocation="C:\Agilent\ICCAP_2008" and |
| |
• |
-V IS_DESTINATION="C:\Agilent\ICCAP_2008" to a new path. |
| • |
To change the home folder setting, change |
| |
• |
-V MY_HOME="C:\users\default" to a new path. |
|
Note
|
|
|
|
|
Using network drives (disk space that physically resides somewhere other than inside the PC running IC-CAP) can degrade performance in a variety of ways. For best performance, install IC-CAP on the local PC with the HOME folder also on the local PC. Do not select a network drive using File > Change Directory. Ensure your temporary disk space is not on a network drive (see Table 9, "System Environment Variables"). Performance problems include, but are not limited to slow:
| • |
UI response when opening file browsers |
|
|
Running a Silent Installation
To run a silent installation on a client PC:
| 1 |
On the client PC, verify that IC-CAP 2008 has not already been installed. There should not be a C:\Agilent\ICCAP_2008 folder since the silent installation process is not expecting it to be there. If IC-CAP has been installed, uninstall it. |
| 2 |
On the client PC, open a Command Prompt or DOS prompt window. In a command prompt, change to the ICCAP2008\cdrom folder that is shared by the server PC. |
| 3 |
Execute the setup.exe command identifying the full path for the response file and use the silent installation option. |
- For example:
-
cd D:\ICCAP2008\cdrom
-
setup.exe -options "C:\temp\response.txt" -silent
| 4 |
After waiting 3 to 5 minutes for the installation process to finish, verify that the installation process is done by checking that the _uninst directory is located under the installation directory. |
Running a Silent Uninstallation
When you need to run a silent uninstallation on a client PC, use the sample response file, uninst_response.txt. Using our example location for the installation contents, the uninst_response.txt file is located in the ICCAP2008\cdrom\silent folder.
To run a silent uninstallation:
| 1 |
In a command prompt, change to the folder containing the uninst_response.txt file. |
-
cd D:\ICCAP2008\cdrom\silent
| 2 |
Copy the uninst_response.txt file to the folder C:\temp: |
-
copy uninst_response.txt C:\temp
| 3 |
Change to the _uninst subfolder in the IC-CAP installation folder: |
-
cd Agilent\ICCAP_2008\_uninst
-
uninstaller.exe -options "C:\temp\uninst_response.txt" -silent
This process opens a progress dialog box. When the dialog box closes, the process is done.
Troubleshooting
The most effective way to troubleshoot errors with the silent install/uninstall process is to run the same type of installation in normal or visual mode.
|