Creating and Running a Macro
This example uses the Bipolar Transistor model bjt_npn and creates a small macro that gives you an immediate visible result.
| 1 |
Open the Example model bjt_npn. |
| 2 |
In the Model window click Macros. 
|
| 3 |
Click New. 
|
| 4 |
In the prompt, type the macro name mactst. |
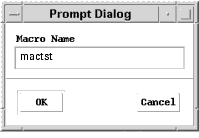
| 5 |
Click OK. The macro name, mactst, appears in the macro list. |
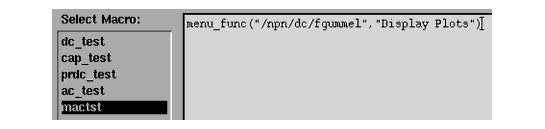
| 6 |
Select mactst. The macro editing text window clears. |
| 7 |
Click anywhere in the text editing area and type: |
- iccap_func("/npn/dc/fgummel","Display Plots")
- where:
- iccap_func specifies the execution of a specific action
- /npn/dc/fgummel is the path name of the setup containing the plots
- a comma (,) separates the path name from the command
- Display Plot specifies the action to perform
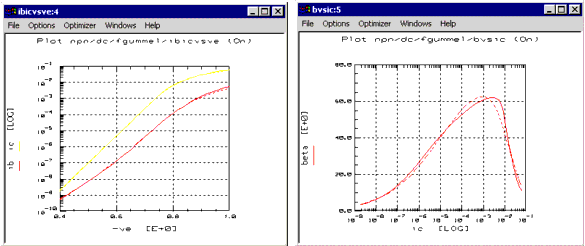
| 8 |
Click Execute to run the macro. 
|
| 9 |
Plot windows, for the two plots defined, appear in the fgummel setup. |
This completes the procedure for creating and testing a simple macro. You can run the macro anytime by selecting it and clicking Execute.
|
Note
|
|
|
|
|
Alternatively, you can execute macros from the Macros menu in the Model window's main menu bar, Macros > Execute > <macro name>. This is useful when you want to run a macro and the Macros folder is not open.
You can save the macro by selecting it and selecting File > Save As. Select the file type Macro, select the macro from the list, and click OK.
|
|
|