
|
Description Hardware Software Audio Samples Links Shows |
DescriptionIntroductionUnlike the other contributors to this work, I am not an artist. I'm an Electrical Engineer and teach microcomputer system design in the Department of Electrical and Computer Engineering at UBC.I was invited by Richard E. Prince to collaborate on the art work that became The Aurora on All Three Channels. My part in the project was the design and implementation of the device that converts the light collected by the phostherion into the sound of the Aurora Borealis. Cost, size, and reliability requirements dictated that we build a custom light-to-sound converter. The conversion is done by a computer program running on a microprocessor. Section 2 describes the hardware and Section 3 describes the software. HardwareEach phostheria focuses a ``Northern Light'' onto a photodiode. The photodiode produces a voltage proportional to the light's intensity. This voltage is sampled by an analog-to-digital converter in a Microchip PIC 16C73A microcontroller. In response to the changing input levels, a program running on the microcontroller sets the duty cycle of a 78 kHz pulse-width modulated (PWM) output which is filtered by an RC filter into an audio-frequency waveform. This audio signal is amplified and drives headphones.The circuit uses the fewest possible components to increase reliability and minimize cost. The 16C73A microcontroller chip integrates a microprocessor, memory, and analog input and output devices. An LM324 ``quad op-amp'' is used to buffer the photodiode signals. An LED indicator allows the circuit to be adjusted without test equipment. A few discrete devices such as resistors and capacitors complete the design. SoftwareIt would have been difficult to generate the desired sounds with analog circuitry. However, it became feasible with the digital signal processing (DSP) approach described here.The behaviour of the light-to-sound converter is defined by a computer program. Every 125 microseconds the program reads the three analog inputs and computes the corresponding value of the sound output. The sound is generated by adding three sine wave signals. The frequency of the first signal varies with the level of light 2 and ranges from 520 to 720 Hz. The frequency of the second signal is offset from the frequency of the first by a frequency difference that varies between -10 and +10 Hz depending on the level of light 1. This frequency offset produces a ``beating'' effect. The first two signals are summed and scaled by a value, set by the level of light 3, between 0.5 and 1.5. The frequency of the third signal varies from 260 to 360 Hz and is also controlled by the level of light 3. In addition, its frequency is varied by +/- 65 Hz by a slowly-changing pseudo-random (noise) value. Considerable effort was spent optimizing the software so that the microcontroller could generate an output sample every 125 microseconds. For example, the oscillators used pre-computed cosine tables, the noise was generated using a 15-bit maximal-length pseudo-random bit sequence (PRBS) generator and almost all multiplications were converted to combinations of shifts and adds (which the microcontroller can do more efficiently than multiplication). ConclusionsThe device was constructed, tested, and has been successfully integrated into Aurora. The project demonstrated that DSP principles can be successfully applied to cost-sensitive applications. The project also provided a rare opportunity to explore inter-disciplinary collaboration within our University.HardwareSchematic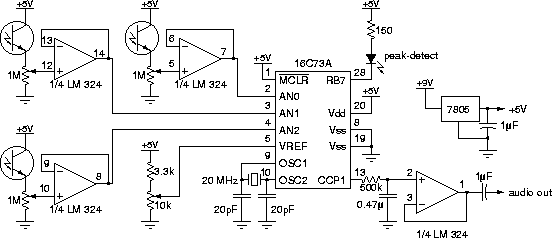
Circuit DescriptionEach of the three photodiodes is connected in series between +5 V and a 1 M ohm potentiometer to ground. The potentiometer forms a voltage divider that allows the current-to-voltage gain for each photodiode to vary from 0 to 1 volt/microamp. The voltage divider output is buffered by unity-gain op-amp circuit and is connected to one of three analog inputs on the microcontroller.The +5V supply limits the LM324 op-amp buffer output to about 3.8 V maximum. The A/D voltage reference input (VREF) is set by a voltage divider consisting of a 3.3k resistor in series with a 10k potentiometer. This sets the maximum reference voltage to about 3.8 V. The microcontroller's pulse-width modulated (PWM) output is filtered by an RC (R=500k, C=0.47uF, RC=0.24s) low-pass filter and buffered by a unity-gain op-amp. The buffer output is AC-coupled to the (high-impedance) audio output. An external low-pass filter should be used to reduce aliasing noise. An LED is connected in series with a 150 ohm current-limiting resistor to microcontroller pin RB7. This active-low output indicates over-range output. It is set low for 200ms whenever an A/D conversion generates the maximum possible result (255). ComponentsICs
Discretes
ConstructionAll components were soldered on an (approximately) 4"x1.5" prototyping board.Component Layout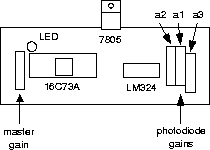
Picture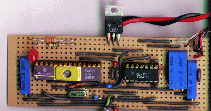
SoftwareThe source code describes how the sounds are produced.The C program can be compiled to run in the microcontroller or to run on a general-purpose computer (to generate samples of the audio output). The code was cross-compiled with the Hi-Tech HPDPIC C cross-compiler. You can also look at the compiler's assembly language output. Audio Samples
Samples of the audio output were generated by using random
numbers in place of the photodetector values. These are available
in .au (8-bit u-law companded) and
.wav formats.
|