
HP Test Development Software
This section describes the HP E1496A Test Development Software for the
HP 75000 Model D20 Functional Test System. The steps that are required
to create a physical test will be described. The E1496A is a software package
that allows a user to either enter test vectors manually in a spreadsheet
or import test vectors from a HP PCF file. While developing a test for
a particular chip, the user may enter a few vectors in the spreadsheet
to debug the settings. Some examples of settings include pin assignments,
pin group definition, and timing information. After verifying that the
settings are correct, the test vectors from the PCF file can be imported
to perform the real test. Tests can be run from within the software or
a text file with a series of SCPI commands for the D20 test system can
be exported and loaded into the tester. In general, tests are run from
within the software during the test development stage. After the test has
been verified, then the commands can be exported to a text file and loaded
into the D20 hardware with VEE Test. The use of VEE Test will be discussed
in the next section.
Figure 7 is the main screen of the HP E1496A Test Development Software.
The E1496A software is installed on the HP 700i Workstation and the command
to load it is hp75000d20. After entering the command, the screen
on Figure 7 appears. As shown by the figure, there are two separate sub-windows
within the E1496A. The one in the back is a spreadsheet with test vectors.
The one in the front is for entering timing information and the timing
of control signals.
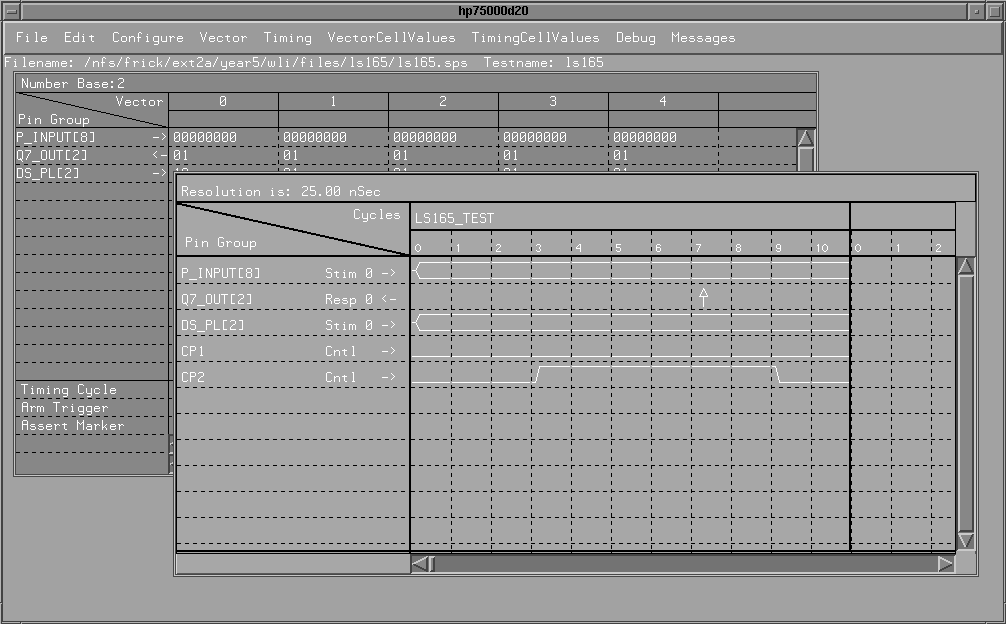
Figure 7: Main Screen of HP E1496A Test Development Software
The flow chart on Figure 8 shows the steps required to setup a digital
test in the E1496A software. The steps are as follows:
- Define Pin Groups
As discussed in an earlier section, a pattern I/O pin group can range from
1-32 pins. Control pin groups should be defined in this step as well. Pin
groups must be defined first before other tasks can be performed. To define
pin groups, select Configure->Define Pin Groups from the menu
bar and a dialog box will appear. The dialog box prompts for the following
information: pin group name, number of pins, type (pattern I/O, control),
mode (stimulus, record, compare) and the timing cycle. There can be a maximum
of 6 stimulus timing cycles and 6 response timing cycles. But in general,
only one of each will be required.
- Assign Hardware Connections
After defining pin groups, the hardware connections (pattern and timing
pods) are automatically assigned. However, these connections can be changed
by selecting Configure->Change Hardware Connections.
- Enter Timing Information/Setup Control Signals
After defining pin groups, the timing information and the timing of control
signals can be entered in the timing window. On the left of the window
is a list of the stimulus/response groups and control signals. By clicking
on the right mouse button, a menu appears. The menu allows the user to
specify when control signals should be high or low, when stimulus test
vectors should be valid, and when responses should be sampled and the end
of the timing cycle. A timing cycle is the length of time that a test vector
is valid and it is divided into four or more sub-cycles. The length of
a sub-cycle is called the resolution and can range from 6.25 ns to 409.6
us. There can be a maximum of 1023 sub-cycles in a timing cycle.
- Enter/Import Test Vectors
Test vectors can be either entered into the spreadsheet window manually,
or imported from a PCF file. To import a PCF file, select File->Import.
- Run Test/Debug
Tests can be run from the E1496A software by selecting Debug->Run
Test. Pattern I/O output pins can also be forced to a certain value
from the run test dialog box. The current value of the response pins can
be read as well. Of course, before the test can be run from within the
E1496A software, both the power sources and the relays on the CMC Test
Head must be turned on. This can be done from HP VEE Test and the procedure
will be discussed in the next section.
- Export Test in SCPI Format
After verifying that the timing information and test vectors are correct,
the test can be exported as a sequence of SCPI commands to be loaded into
the D20 hardware by HP VEE Test. To export a test, select File->SCPI
from the menu. The test can be saved by selecting File->Save
or File->SaveAs.
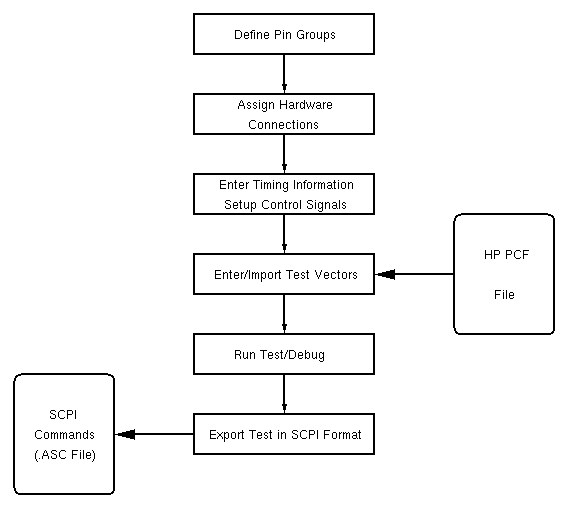
Figure 8: Steps to Develop a Digital Test in E1496A
The 74LS165 example will describe the steps in Figure 8 in detail. The
next section is a description of HP VEE Test and how it can be used to
perform physical testing of ICs.

